knacksnews
How to Compress Files on Your Mac: The Complete Guide
Compressing files on a Mac isn’t just about saving space. It’s about keeping your digital life neat, making transfers faster, and ensuring everything’s bundled together just how you want it. Whether you're a longtime Mac user or someone new to the platform, understanding how to reduce file size efficiently can make a real difference in your day-to-day routine.
From organizing your work documents to sending large video files, compression plays a quiet but important role. And no, you don't need to be tech-savvy to do it. This guide is written to walk you through everything you need to know about file compression on macOS—without the fluff and the frustration.
Why Compress Files on Mac?
Most people don’t think twice before hitting “Save” or “Download,” but as the number of files on your Mac grows, so does the clutter. That clutter eventually eats into your storage, slows down your backups, and can make it a chore to move files between devices. Compressing files solves a lot of these issues in one go. It reduces the size of individual files or entire folders, making them easier to archive, share, or store. But beyond saving space, it’s also about organization. Instead of sending ten files separately, you can zip them into one tidy package. And let’s be real—smaller files move faster, especially when uploading to cloud services or sending via email.
macOS actually makes this pretty easy. Built-in tools mean you don’t have to download a third-party app to get started. But if you want more control over compression formats or levels, third-party software can give you extra muscle. Whether you’re handling documents, photos, videos, or large folders, the key is understanding which method suits your needs and how much compression you actually want.
There’s also the side benefit of data security. While compression itself doesn’t encrypt files, many tools let you add password protection as part of the process. So not only do you shrink the size, but you also keep nosy eyes out.
Built-in Compression Tools on macOS
macOS comes with a simple and effective built-in compression tool. If you've ever right-clicked on a file or folder and noticed the “Compress” option, you’ve already encountered it. This feature quickly turns selected files into a .zip archive, which is compatible with virtually all systems, including Windows, Linux, and mobile devices. This ensures you can easily share your compressed files with anyone, regardless of their operating system.
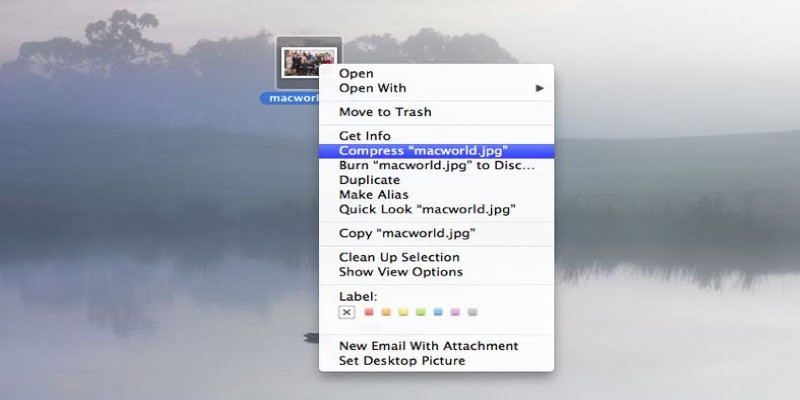
To compress a file or folder, select it, right-click, and choose "Compress." The system will create a .zip file right next to the original item. MacOS uses the ZIP format because it's efficient, universally accepted, and built right into the system. Unzipping is just as easy—double-click on the .zip file, and it expands into a regular folder.
While convenient, the built-in tool doesn't provide many options. You can't choose compression levels or formats, and it doesn't allow password protection. Third-party apps are needed for advanced features like these. However, for basic compression tasks—such as quickly compressing files for sending or backing up—this built-in feature is more than adequate. It works smoothly and efficiently for most everyday tasks without requiring any extra software.
Third-Party Compression Tools for Advanced Users
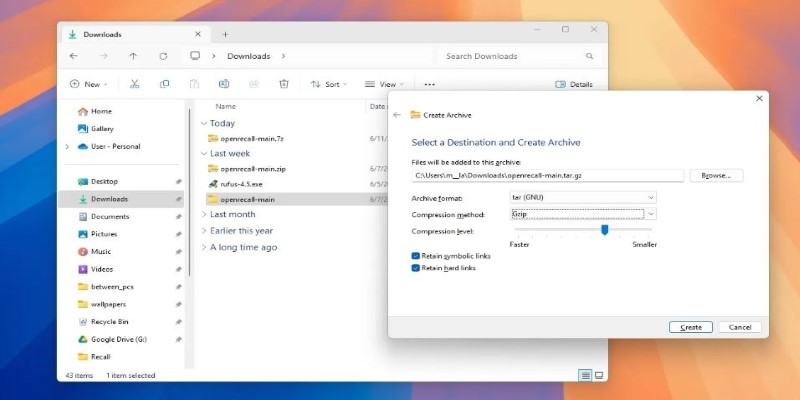
For more advanced compression needs, macOS's built-in utility may not be enough. Third-party tools are your best option if you want to use other formats like RAR or 7z or need extra features like password protection.
Keka is a popular choice. This lightweight and intuitive app supports multiple formats, such as ZIP, 7z, TAR, and RAR. Keka allows you to select compression levels, split archives into parts, and add password protection. Simply drag and drop files into the app, choose your settings, and you're set. It also works seamlessly for decompressing uncommon formats.
The Unarchiver specializes in extracting files rather than compressing them, but it supports an extensive range of formats. It’s perfect for dealing with files in different formats you might encounter.
For users looking for more control over compression-heavy tasks, tools like BetterZip and Archiver provide advanced features, including the ability to preview archive contents before extracting them. These tools allow for a more tailored compression process and are great for complex workflows.
For those comfortable with the command line, utilities like zip, tar, and gzip offer flexibility and speed. While not as user-friendly as graphical apps, they can be powerful solutions for automating tasks or handling large batches of files.
Third-party compression tools provide greater flexibility, no matter your needs, making them essential for power users who need more than basic compression.
Compression Tips for Different File Types
Not all files compress equally. Some formats, like JPEG images, MP4 videos, and MP3 audio files, are already optimized, so basic ZIP compression won’t significantly reduce their size. When working with media files, don’t expect dramatic results from simple compression methods.
Text-heavy files, such as documents, spreadsheets, and PDFs, tend to compress much better. If you’re compressing a folder filled with Word docs or Excel sheets, you’ll likely see a significant reduction in size.
The compression results for folders with mixed content—like a project folder containing both images and text—can vary. To achieve better compression, use more aggressive formats like 7z, which offer higher compression rates but take longer to process.
If speed is your priority, ZIP is a quick and efficient option, especially since it’s built into macOS. However, for long-term storage where space is crucial, formats like 7z or TAR will save you more space.
Always check file sizes before and after compression to understand what works best. And if you’re sending files by email or uploading them, keep in mind size limits and test uploads first.
Conclusion
Compressing files on your Mac is a simple yet effective way to save space, streamline file transfers, and keep your digital workspace organized. Whether using the built-in tools or exploring third-party options for more control, compression helps you manage your data efficiently. By adopting this practice, you'll improve workflow speed, reduce clutter, and ensure smoother file sharing. Embrace compression as part of your routine to make the most of your Mac’s storage and performance.
Related Articles

Remini Video Enhancer Review: Transform Your Videos with AI Technology
How to Convert MP4 to OGG Offline: 7 Top Tools
Best AI Video Watermark Removers Online: Top 4 Tools for Seamless Editing

Convert M4V to MP4 Easily: Five Reliable Methods to Use
Reduce Video Size: 3 Quick Ways to Compress a Video for Email

Understanding 2K Resolution: A Key Player in Digital Video Production

How to Colorize Your Black and White Videos: 5 AI Tools You Should Try
Convert MKV to MOV with These 2025 Online Tools
How to Change MOV to MP4 on Mac in 2025: 5 Reliable Methods

Fast and Free AI-Powered Tools to Cleanly Cut Photo Backgrounds

Convert 2D to 3D with LeiaPix Converter: A Complete Review